Creating an Overlay
FoliCon v5.3.0 introduced a data-driven overlay package system. Overlays are no longer hardcoded into the app — they are small, distributable packages that FoliCon loads dynamically. Anyone can create one and share it with the community.
Choose Your Method
There are two ways to build a custom overlay:
The Overlay Designer is the easiest way to get started. It gives you a live WYSIWYG canvas inside FoliCon — no files to write by hand.
Open the designer from
Design your overlay visually — adjust layout, text, colours, and positioning
Use the live preview to see the result on a real folder icon
When you're happy, export it as an overlay package ready to submit
If you prefer full control, you can author the overlay package files directly.
An overlay package is a folder that contains three things:
A
manifest.jsondescribing the overlayAn overlay definition file (e.g.
overlay.json) that defines the visual layoutA preview image (
preview.png, 256×256 px or larger)
Package structure:
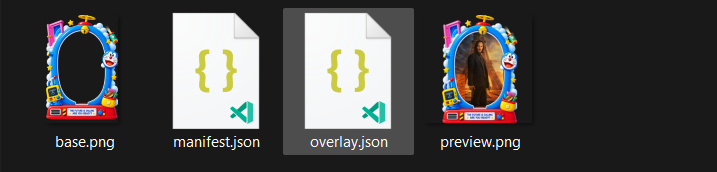
manifest.json fields:
Field | Type | Description |
|---|---|---|
| string | Display name shown in the store |
| string | Your name or handle |
| string | Semver version, e.g. |
| string | Short description shown in the store |
| array | Search tags, e.g. |
| string | One of: |
| string | Filename of the preview image, e.g. |
Submit to the Community Store
Once your overlay package is ready, you can share it with everyone through the FoliCon-Overlays repository. After it is merged, it appears automatically in the Overlay Store for all FoliCon users.
Submit your overlay
Fork the FoliCon-Overlays repository on GitHub.
Add your overlay package folder into the overlays/ directory of your fork.
Open a pull request with a title and description explaining your overlay — what it looks like and what media type it suits best.
After review and merge, your overlay appears in the Overlay Store automatically. No app update needed.
Tips for a Great Overlay
Use a strong preview image. The preview is the first thing people see in the store — make it clear and representative of the overlay at its best.
Keep the name short and memorable. Names like
"Minimal Dark"or"Doraemon"work better than long descriptions.Test on both light and dark folder backgrounds before submitting — some overlays look great on one but not the other.
Add meaningful tags. Good tags help users find your overlay when searching. Think about the media type, visual style, and mood.
Bump the version in
manifest.jsonwhen you update an overlay so existing installs can detect the update.